Happy Halloween 🎃
My oldest is 7 and my youngest is 3. When we're in the car, my oldest asks me precisely 529,214,634 questions. Halloween had just passed and one day, while driving, we had a conversation that went something like this:
Declan (oldest): Hey daddy, can we build a robot?
Me: Hmm, what kind of robot were you thinking?
Declan: I don't know.
        Maybe a spooky pumpkin.
        One that shoots candy at people!
        And sprinkles!
        And that has lights!
        And...
Ian (youngest): Yes!
I love it. He's inquisitive and creative. We talked some more and narrowed down the requirements with an understanding that "we'll keep working on it and improve it each year".
Initial Requirements
- It needs to see a person
- It needs to flash a light
- It needs to play a sound
- It needs to be something we can implement in a weekend (with a little upfront research for purchasing and planning)
Materials
The Board
We had a Raspberry PI sitting around so we hooked that up and threw Python 3 on it. This was an old Model B, so the old 26 pin style. We could have done this with an Adruino, but we wanted to time-box the project and figured that playing sound through the RPI would be easier than working with the Arduino.
The Sensor
We had a couple options for sensors. Initially we were thinking of using a trip laser similar to those used in many home security setups. But, we weren't convinced on the cost for distance. Plus, our house has a couple ways to get to the door. So, we wanted something that would almost scan a 180 degree area.
So, we landed on a PIR sensor like the ones you see on automatic lights.
Lighting
We had a number of spare LEDs and resistors so we didn't need to get any.
Sound
We didn't have a bluetooth connector for the Raspberry PI so we just used an aux coord to connect to a speaker.
The Process
We started this process off with a plastic pumpkin. Being the adult, I carved out the eyes, nose, and mouth- we wanted to light to shine through the face and not just the top.

Once we had that done and the sharper edges sanded down, we needed to make the circuit for the LED. LED circuits are pretty straight forward and pretty straight forward to explain as far as circuits go. Evil Mad Scientist already has a great explanation of how to determine the resistance needed for a circuit with an LED so check that out if you're curious. In our case, we needed a 60 OHM resistor. We ended up with 4 resisters in a series to get the resistance we needed (in a series like this, the resistance is cumulative). This should give us the maximum brightness without messing up the PI.

With our components in hand, we hooked up the circuit. We connected the circuit to the number 3 pin on the Raspberry PI and completed it to the number 6 pin, ground. The positive was connected to the first resistor, and we completed the circuit by connecting ground to the tail of the LED.
Once we had the circuit put together, we needed to add some code:
import RPi.GPIO as GPIO

OUTPUT_PIN = 3

GPIO.setwarnings(False)
GPIO.setmode(GPIO.BOARD)
GPIO.setup(OUTPUT_PIN, GPIO.OUT) # output signal to GPIO pin 3

while True:
    # on
    time.sleep(1)
    GPIO.output(3, 1)

    # off
    time.sleep(1)
    GPIO.output(3, 0)
This allowed our LED to blink on and off. Declan really had fun putting this circuit together and

From there we needed to hook up the PIR sensor as a trigger for the LED.
The PIR has 3 wires. The first is the power/positive, then signal, and last ground. We connected the positive to pin 2 which is a 5V power source. This is necessary because the PIR produces a 5V output when it detects "someone". We connected the signal wire to pin 11. We connected the ground to the same ground as the LED circuit.

And, once again, we needed some code. This time to listen for input from the sensor through the signal wire.
import RPi.GPIO as GPIO
import time
import random

print('Starting up Pumpkin Spy!')
OUTPUT_PIN = 3

GPIO.setwarnings(False)
GPIO.setmode(GPIO.BOARD)
GPIO.setup(11, GPIO.IN) # read sensor settings from PIR
GPIO.setup(OUTPUT_PIN, GPIO.OUT) # output signal to GPIO pin 3

try:
    while True:
        pirIn = GPIO.input(11)

        if pirIn == 0:
            # Nobody around
            GPIO.output(3, 0)
            time.sleep(0.1)
        elif pirIn == 1:
            # Someone around
            # flicker
            GPIO.output(3, random.random() > .7 and 1 or 0)
            time.sleep(0.1)
except KeyboardInterrupt:
    pass
    GPIO.cleanup()
At this point we had essentials, the LED turning on by the PIR. Next we needed to connect the speaker, and control the flashing of the LED. This was mostly code, and a bit of installation in raspbian. The speaker connected to the RPI using the AUX port. We threw together a WAV file with "Happy Halloween" and a laugh on it that we mucked around with in Audacity. The last requirement was playing this sound. We ended up with this code that allowed us to both control the volume output by the RPI and stream the contents of the file over the speaker.
import RPi.GPIO as GPIO
import time
import pyaudio
import wave
import random
import alsaaudio
print('Starting up Pumpkin Spy!')
OUTPUT_PIN = 3
GPIO.setwarnings(False)
GPIO.setmode(GPIO.BOARD)
GPIO.setup(11, GPIO.IN) # read sensor settings from PIR
GPIO.setup(OUTPUT_PIN, GPIO.OUT) # output signal to GPIO pin 3
m = alsaaudio.Mixer('PCM')
resetVolume = 50
m.setvolume(93)
try:
def playSound():
# define stream chunk
chunk = 1024
# open a wav format music
f = wave.open(r"./halloween_audio.wav", "rb")
# instantiate PyAudio
p = pyaudio.PyAudio()
# open stream
stream = p.open(format=p.get_format_from_width(f.getsampwidth()),
channels=f.getnchannels(),
rate=f.getframerate(),
output=True)
# read data
data = f.readframes(chunk)
# play stream
while data:
GPIO.output(3, random.random() > .7 and 1 or 0)
stream.write(data)
data = f.readframes(chunk)
# stop stream
stream.stop_stream()
stream.close()
# close PyAudio
p.terminate()
while True:
pirIn = GPIO.input(11)
if pirIn == 0:
# Nobody around
GPIO.output(3, 0)
time.sleep(0.1)
elif pirIn == 1:
# Someone around
playSound()
time.sleep(0.1)
except KeyboardInterrupt:
pass
GPIO.cleanup()
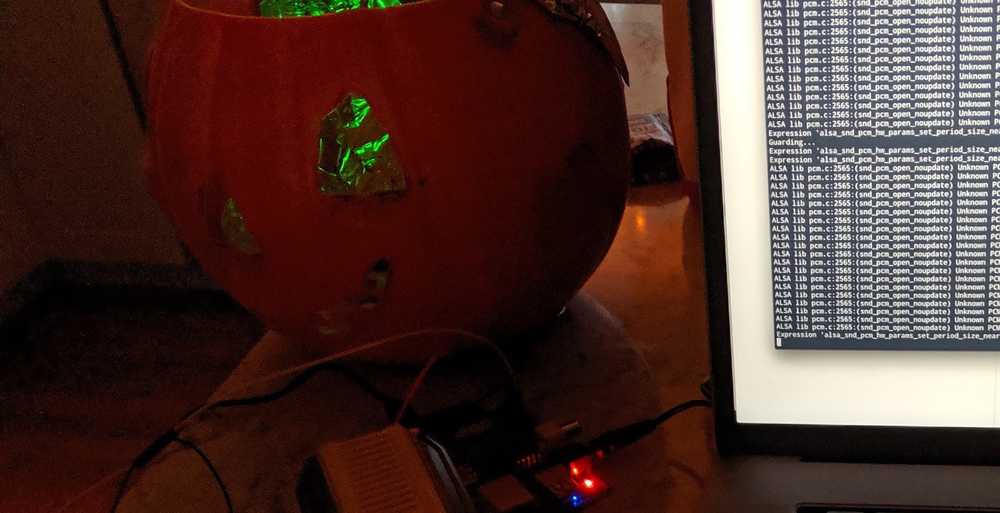
m.setvolume(resetVolume)And the final product? You can see for yourself.

We used some additional resources to help us with the project. Here's a list of them:
Maybe you'll find this useful. It was a great starter project for my oldest and for the past few weeks since working on it he's been coming up with new ideas to add to next years version. Stay tuned. 😃